Showing posts with label HARDWARE. Show all posts

Saturday, July 19, 2014

BlackBerry Tour 9630 Niagara Trackball Solution

ASALAMUALAIKUM WR WB

Problems:
1. OK button when press center ball is work
2. No directional work Up, Down, Left, Rigt

Getting tired with all methods never works.
Let's play my method, always work on BB Tour 9630 Trackball problems.

1. Check voltage need to make DOME working. Don't be lazy, make your own know the trouble maker.
2. Check lines, most important lines see this fig
http://haribagibagi.blogspot.com/2014/07/blackberry-tour-9630-niagara-trackball.html
3. Check connected components to S 1301
http://haribagibagi.blogspot.com/2014/07/blackberry-tour-9630-niagara-trackball.html
4. If found no problem on both steps above, this will be the real solutions:
a. Clean DOME socket 'till it shiny, use sand paper to coarse with gently.
http://haribagibagi.blogspot.com/2014/07/blackberry-tour-9630-niagara-trackball.html
b. Do the same to S 1301, before cleaning S 1301 re-hot this with 280 hot and 2,5 airflow
c. Wipe using a toothbrush both sockets after coarse. The metal dust leftover cause of short pins.
5. If still not working replace trackball, u can use white, orange or black colors ball for replacing. Because we only need the four magnetic rollers. The ball colors isn't the problem. Last work to me is black, cause i have only in my stock.

I have that whatever OS never take affect to TRACKBALL problem. The hardware is hardware, the software is software. Bullshit if OS made this trouble.

wasalamualaikum wr wb


Arek NGAJUM IsoIso Ae [ The Fully Fuckin' Headache Lion ]

Friday, May 3, 2013

BEYOND B-71 Keyboard

ASALAMUALAIKUM WR WB


OUTER/COL wiring


INNER/ROW wiring


SOCKET


Main Board socket wiring


wasalamualaikum wr wb


Arek NGAJUM IsoIso Ae [ The Fully Fuckin' Headache Lion ]

Friday, February 8, 2013

SONY E15i, E16i, X8 Charging Ways

ASALAMUALAIKUM WR WB


Due to Not charging happen to SONY E15i, E16i, X8. This can be the troubleshoot to the case. Watch and read the pictures carefully when doing test.


By those above pictures i hope you can find which way need to jumper or which components need to replaced when troubles on charging came. NO question, NO further explanation on how to do. I think they all clear.
THANK YOU

wasalamualaikum wr wb

Arek NGAJUM IsoIso Ae [ The Fully Fuckin' Headache Lion ]

Monday, December 3, 2012

Cara Ganti Microfone NOKIA 5310 Xpressmusic

ASALAMUALAIKUM WR WB


Cara mengganti microfon Nokia 5310 Xpressmusic apabila kesulitan mencari pengganti microfon 5310 yang berbentuk kotak.
Microfon condenser berbentuk kotak tidak sama dengan yang berbentuk bulat. Pada mic condenser kotak dibenamkan komponen tambahan didalamnya sehingga memiliki 4 buah pin kaki.
Perhatikan skema berikut ini


Dari skema tersebut dapat diketahui bahwa sebelum sinyal suara yang diterima oleh mic condenser dikirim ke ic avilma, sinyal suara lebih dulu melewati beberapa komponen bridge untuk mengubahnya menjadi sinyal digital yang dapat diproses oleh avilma.


Bagaimana bila anda kesulitan untuk mendapatkan mic condenser pengganti yang sama. Tentu anda harus mengganti dengan yang lainnya. Pada contoh kali ini akan saya gunakan pengalaman saya ketika menangani kerusakan microfon yang terjadi pada ponsel sony ericsson K750. Karena kesulitan mencari mic pengganti yang sama, akhirnya saya putuskan untuk menggunakan mic condenser berbentuk bulat. Dan sudah tentu ada trik khusus agar mic baru ini dapat bekerja.


Lepas microfon kotak anda dari pcb 5310 xpress. Pasang sebuah resistor jumper berukuran 1 Kilo ohm [ bisa dicari di mesin hp bekas, atau menggunakan mesin bekas MPEG VCD ]. Pasang resistor tersebut pada pin kaki nomor 2 dan 4. klik gambar pcb nyata agar lebih jelas. Selanjutnya dari pin nomor 2 solderkan seutas kawat email menuju inner [ micP ] pada microfon bulat. Dan bagian luar hubungkan ke pin 1 pada pcb untuk pembumian [ grounding ]. 

Setelah selesai dan saya coba ternyata pengalaman tersebut bisa dipraktikkan pada ponsel NOKIA juga. Dan hasilnya microfon bekerja normal mengirim sinyal suara ke ponsel penerima. Semoga pengalaman saya ini bermanfaat juga untuk rekan-rekan. Namun jangan lupa juga untuk memeriksa tiap-tiap komponen yang saya beri warna kotak merah.


wasalamualaikum wr wb

Arek NGAJUM IsoIso Ae [ The Fully Fuckin' Headache Lion ]


Sunday, October 14, 2012

SonyEricsson W302 Not Charging Troubleshoot [How To JUMPER]

ASALAMUALAIKUM WR WB


Needed for work :

1. Volt Ampere meter measurement [ prefer to analog with good sensitivity X1 scale ]
2. Jumpering Wire
3. Filament Soldering
4. Schematic diagram
5. Own Head

See How to check :

1. First perform checking USB connector on the phone [ change it if there are too many broken pin on its ]
2. Check the line connection from USB connector pin number 12 to each its components connected


3. Don't leave GROUND connection!!! it's the most important of all currents flow, if you loose connection to the ground however big DC current flow will be have wasting energy only [ trust me ].
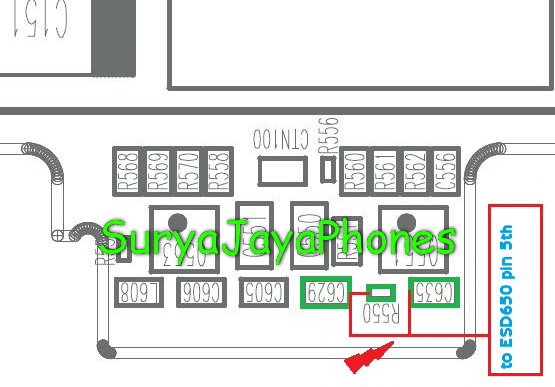
4. For charge + input check the line from USB connector pin number 12 to C629, C635, and ESD650


5. Watch the measurement, if it goes to 0 ohm that means a good line connection [ no action means broken line ]


6. If there is no problem by the wire line, you can perform check the short components or event dead to C629, C635, and ESD650 [ compact diode EMIF ]


7. If you decided to make a jumper line it should connecting the RED lines to each other of the RED lines, this line where the charge current come from the wall charger. And the YELLOW line is GROUNDED.


wasalamualaikum wr wb

Arek NGAJUM IsoIso Ae [ The Fully Fuckin' Headache Lion ]


Friday, October 12, 2012

SonyEricsson W150i Display Troubleshooting

ASALAMUALAIKUM WR WB


       What do you think need to replace it's display with the new one, see this fig.


Its just seem as your color TV set without any antenna. haa....3x
Wait the minutes, we need to save more money for wife and children
What we need is first to check it out
all the connections of wiring and components to the display to work fine.


First and  the easiest is to clean the socket pins of the display, little scratch using piece of razor may helpful to do.
Gathering no result, be patient. Go to the next step, readout you schematic repair manual.


Pay attention of measurement of dc currents for pins 25 and 26 [ they should have 1.8v for pin number 25 and 2,8v for pin number 26 ] on the display connector on the mainboard, learn from where they come out.
You can make jumpers for every parts in the green boxes, but check them first may you not to do something unnecessary.


There are nothing wrong to wiring and the components on it connected?. Clean up the display connector.


Open up the cap of  baseband box, check the wiring and componnents as see on the fig. above
Gave un useful result of all have done, are u frustrate ??? NO NEED TO FRUSTRATED. See below


For every single green arrows i show you they need your attentions to check their conditions and measurements. The red arrows i show you in every picture those mean you can rehot, reball or change if needed. And you should to know that rehot the PNX6513 was very clear to my case. Its work for me, so try to check first before you spent your money. The most easy step to proof the damage of display try it first to other phone and cross change the display to each other. I show you my handled below.

no parts to be changed

More save, more easy, this called knowledge and experiencess. GOOD LUCK and HAVE A GOOD DAY.

Thank you very much
If you need the schematic diagram of sonyericsson W150i just tell me. I'll upload with pleasure for all my friends of NEWBIE


wasalamualaikum wr wb

Arek NGAJUM IsoIso Ae [ The Fully Fuckin' Headache Lion ]


Wednesday, October 10, 2012

Ganti Touchscreen NOKIA N9 China Clone [ Sunup Branded ]

ASALAMUALAIKUM WR WB


       Trik sederhana dalam membongkar pasang ponsel cloning buatan cina ber-merk SUNUP [ kalo orang jawa beli ponsel ini saya jamin akan SENEP >senep;java;adj;stoamache;gathering pain in stoam ] dengan type NOKIA N9.
Bentuk dan tampilan ponsel cloning china memang menarik dan berkesan ponsel kelas wahid. Namun belum puas para pembeli meng-operasi-kan nya ponsel tersebut sudah membuat ulah kerusakan. Kebetulan kerusakan kali ini akibat dari kecerobohan sang pengguna, jadi tak perlu menyalahkan kualitas ponsel yang pas-pasan ini. Berikut ini cara mengganti kerusakan touchscreen yang mengalami keretakan atau kerusakan touchscreen yang umum lainnya.


A. Lepas tutup layar LCD yang bertuliskan NOKIA dengan cara mengelupasnya. Tutup ini hanya direkatkan saja pada frame layar LCD bagian depan menggunakan double tape. Selanjutnya lepas 4 buah sekrup yang ditunjuk tanda panah dengan nomor 1 sampai 4.
ket. gambar :
1,2,3,4 >> sekrup frame layar LCD bagian depan
6 >> menunjukkan keretakan layar touchscreen
7 >> kamera sekunder ponsel
8 >> penutup dan pelindung layar LCD secara keseluruhan


B. Lepas frame logam pelindung layar LCD depan dengan cara mencungkilnya, harap hati-hati ketika mencungkil jangan sampai mengakibatkan kerusakan lain pada layar LCD.
ket. gambar :
1 >> soket eksternal memory
2 >> frame layar LCD bagian depan


C. Keluarkan layar LCD dari framenya seperti terlihat pada gambar berikut.
ket. gambar : 
1 >>  5mm audio jack 
2 >> eksternal memory socket
3 >> sim card socket
4 >> rear screen holder
5 >> volume up
6 >> volume down
7 >> power button
8 >> rear screen holder screw
9 >> battery
10 >> rear screen holder screw
11 >> 2nd rear screen holder
12 >> buzzer/loud speaker
13 >> vibrator 
14 >> screen serial number
15 >> touchscreen flex connection pins


D. Bila ingin melakukan perbaikan hardware yang terdapat pada mainboard ponsel, lepas dua buah sekrup frame layar LCD belakang yang ditunjuk panah dengan nomor 8 dan 10. Keluarkan frame layar LCD bagian belakang untuk mengeluarkan mainboard dari posisinya.
ket. gambar :
1 >> whole screen
2 >> cracked of touchscreen
3 >> vibrator
4 >> buzzer/loudspeaker


E. Bila pekerjaan hanya sebatas mengganti layar touchscreen maka anda tidak perlu melepas frame layar LCD bagian belakang. Untuk melakukan penggantian layar touchscreen, lepas fleksibel touchscreen dari fleksibel layar LCD menggunakan solder FILAMEN. Letak fleksibel touchscreen pada fleksibel layar LCD ditunjukkan pada gambar  dengan nomor panah 15. 
Lakukan pemasangan layar touchscreen baru anda, INGAT : lakukan pelepasan dan pemasangan layar touchscreen seperti gambar berikut ini dengan tujuan tidak merusak layar LCD akibat dari panas yang dihasilkan oleh solder FILAMEN.
ket. gambar :
1 >> camera flex
2 >> prolific USB port
3 >> main screen
4 >> touch screen


DEMIKIANLAH CARA SEDERHANA DALAM MEMBONGKAR PONSEL CLONING


wasalamualaikum wr wb

Arek NGAJUM IsoIso Ae [ The Fully Fuckin' Headache Lion ]