Saturday, November 30, 2013

Sony Ericsson E16i Xperia W8 Dead Phone Flashing

ASALAMUALAIKUM WR WB


Diagnose : The phone doesn't start
                   When Power Button Pressed it's only have vibrate
                   No display after failed to boot up

1. Run setool2g.
2. Tab PDA, choose USB on Interface, and select phone type
e16 xperia w8 flashing-1
3. Tab Settings and check mark items there, see below picture
e16 xperia w8 flashing-2


4. Back to PDA now click Add to choose Firmware Package for E16i Xperia W8
e16 xperia w8-3


5. Then hit Identify
6. After phone identifying finished, now time to hit Flash. Wait the flashing progress finish
x16 xperia w8-4


7. After flashing and customizing the phone finished, Clear the firmware package field. Then again hit Flash button. Here it is the finalizing.


Attach the USB and phone battery out of the phone for a while. Put back the battery to the phone then turn on the phone. Now it should be okay. It's reborn.

THANK YOU

wasalamualaikum wr wb


Arek NGAJUM IsoIso Ae [ The Fully Fuckin' Headache Lion ]

Chromebook New Stylist Google Chromebook Released

ASALAMUALAIKUM WR WB


Easy to share
Switch between accounts in a snap or let someone new sign in. All your stuff stays separate.
chromebook 2

Guest mode
Lend your Chromebook to a friend without giving access to your stuff, like files and documents.

Supervised users
Help your child and other family members explore the online world in an environment that you can manage. Learn more

Plays nicely with others
Works with your other devices – your phone, tablet or an old computer – without any extra cords.
chromebook 3
Take a photo on your phone then edit it on your Chromebook. With Google+ Photos, your snapshots sync automatically. 

Gives you peace of mind
Virus protection built-in. No annoying updates. Chromebooks run Chrome OS, an operating system that’s fast, simple and secure.
chromebook 4


Built-in protection
Virus protection, multiple layers of security, and verified boot help keep you safe from viruses, malware and other computer nasties.

Keeps your files safe
With Google Drive built-in, your files and photos are automatically backed up. You get 100GB of storage , for free*, with all new Chromebooks.

Stays fresh, all by itself
Chromebook updates itself, for free. So you always have the latest and greatest version. No need for manual downloads and upgrades. for free. So you always have the latest and greatest version. No need for manual downloads and upgrades.

 Meet the family
Chromebooks are fast, easy to use, and great for everyone in your life who could use a computer. 
chromebook 5
Some things like Hangouts, voice search and auto updates obviously require internet. 

wasalamualaikum wr wb


Arek NGAJUM IsoIso Ae [ The Fully Fuckin' Headache Lion ]

Friday, November 29, 2013

Re-Enable Registry Editor, Command Console, etc

ASALAMUALAIKUM WR WB


Re-enable was designed to repair the left over damage caused by Viruses,Malware Trojans.
By now most of you will already know that viruses that disable such critical Windows features
are very common. Once the virus disables any of the feature, common users have no choice
but to reinstall the Windows or perform complicated registry changes.
Re-Enable plans to change all this with a dead-simple tool.

With one click Re-enable will repair the following windows features.

Re-enable version 2 has been tested with daprosy worm - sality AA and other
sality variants - fake antivirus ‘s  and many more with 100% success

Make sure the viruses have been removed before running re-enable for best results however
If you do run re-enable with viruses still running the viruses may undo re-enables repairs.
For a list of virus removal tools see the download page. If re-enable fails in any way ,chances
are the virus is still running.

Requires Microsoft .net framework 3.5 Sp1 or above. Or for none .net framework Pc’s there's
a portable version ,I would recommend that you use the .net version as its size is considerably
smaller or use the installer version.
Portable version runs on any pc or laptop that doesn't have .net framework installed because
the .net framework is included in the code ,this is why the size is larger than the normal exe


 Re-enable is free for personal and none commercial use only.
Commercial usage please contact me
Thank you for taking in a interest in re-enable ,if you feel that re-enable v2 helped you in
any way please consider donating to the project by clicking the donate link.

wasalamualaikum wr wb


Arek NGAJUM IsoIso Ae [ The Fully Fuckin' Headache Lion ]

Thursday, November 28, 2013

Repair Bad/Strange China Phones IMEI using MCNPro Box

ASALAMUALAIKUM WR WB


Could You make a communication using your device without it ?
Simply IMEI is the soul of every phone device all over the world, without this you can't make any communication. 
For China phones devices it is very-very easy to repair IMEI of your Device, even it has multiple IMEI number. You can do it with non legal tool. It's so easy. But now i wanna show how to fix it using a legal tool called MCNPro Box the universal China phones flasher box.

The Steps below :

1. Run MCNPro Box.exe, on china phones has MTK/MT cpu based it will work fine through Rx Tx Scan method. But for others you need using USB Scan method [ it's little terrible to other cpu ]
2. Scan the device and hold power button or boot button [ sometimes need other as boot button ]
3. When scanning complete, Apply the result to the box by click Apply.
4. First at all try to read phone firmware for backup. Give it name for ex: something.BIN for the firmware. Next Backup NV Data, this is the most important to repair IMEI and save it as ex: something_NV.BIN
5. Now on the IMEI Options: click Read for the first IMEI number on the phone and next the second's.
6. Note: Please write on Notepad or on apiece of paper all IMEI number on the phone label. usually they typed on the label right on the phone battery case, so write 'em all.
mcnimei-1
7. Now go to Read/Write Flash: on the field click browse and find out your NV Data had backed up. This will really important to do repair IMEI. If you don't have that, the last 15 digits IMEI number won't automatically writen on the field.
8. Type both IMEI number to the fields of each. Next click Write to writing correct valid IMEI number to the device.
mcnimei-2
9. Compare your bad IMEI with the new just written. 
10. Proof it that the IMEI has correctly written without any mistakes by click Format Button on MCNPro Box. Then after formatting finish Read back the phone IMEI's.
mcnimei-3
11. Take a look at MCNPro result log, are they still there, if it's yes you're lucky one. You do the right job

And Now the phone is ready to communicate with it's friends around the country.
GOOD JOB ALWAYS GIVE A TRUSTED 

That's all what we need. Keep fight NOOBS....
Thank you for your coming

wasalamualaikum wr wb


Arek NGAJUM IsoIso Ae [ The Fully Fuckin' Headache Lion ]

Tuesday, November 26, 2013

IceDragon: A faster, more secure version of Firefox

ASALAMUALAIKUM WR WB

Features
    Fast, easy to use and light on PC resources
    Scan web-pages for malware right from the browser
    Lightning fast page loads with integrated DNS service
    Privacy and performance enhancements over Firefox core
    Full compatibility with Firefox plug-ins
ice
Comodo IceDragon [Firefox core]

Comodo Dragon[Chrome]


Overview
Comodo IceDragon is a fast and versatile Internet browser based on Mozilla Firefox which features several security, performance and feature enhancements over the core build. Fully compatible with Firefox plug-ins and extensions, IceDragon combines the freedom and functionality of Firefox with the unparalleled security and privacy of Comodo.

System Requirements
    Windows 7 / Vista / XP – 32/64 bit
    128 MB RAM
    40 MB Hard Disk Space

IceDragon is made possible by the Firefox open source project based on Firefox 25.0.0.1

Features

SiteInspector's link scanning feature allows you to check whether a web page is malicious before you actually visit that page. To scan a page that seems suspicious to you, simply right-click on the link to that page and click 'Scan Link'. Alternatively, the SiteInspector button at the top corner of IceDragon allows you to instantly scan the page you are looking at to find out if it contains viruses or other malware. When the scan is complete, you'll see a detailed breakdown of site safety, domain registration details, administrative contacts and a history of previous malware scans on that website.
Secure DNS service

IceDragon users are also given the option to use Comodo's Domain Name System (DNS) servers, free of charge. Doing so brings about several advantages, including:

    Web-pages load faster – Comodo operate a huge network of fully redundant DNS servers located at optimal locations around the world. This means your requests for web-pages are always resolved by the high performance DNS cluster closest to you. The result? Websites load faster than if you continue to use the DNS server provided by your ISP (which you share with all their other customers).
    A safer Internet experience - SecureDNS helps users keep safe online with its malware domain filtering feature. SecureDNS references a real-time block list (RBL) of harmful websites. These include phishing sites, malware sites, spyware sites, and parked domains that contain excessive advertising. You'll be warned whenever you attempt to access a site containing such potentially threatening content. Our highly secure infrastructure also reduces your exposure to DNS poisoning attacks.

Social media integration
Found an interesting page or video? IceDragon's dedicated social media button makes it easy to instantly share your web-finds with your Facebook, Twitter or LinkedIn friends.
Privacy and performance enhancements

IceDragon features several tweaks to the core Firefox build to improve both security and performance. These include the removal of crash report and performance data submissions, the removal of the snippets service, an all new update module and many other under-the-hood enhancements. We think this make IceDragon the fastest and most secure version of Firefox around.

Designed with you in mind
The IceDragon interface doesn’t just look good – it’s the result of thousands of hours of careful usability testing. We’ve put everything you need in clear view to make sure you accomplish what you want, fast!

FAQ

What's the difference between Mozilla Firefox and Comodo IceDragon?
    IceDragon features privacy and performance enhancements over the Firefox core browser as well as additional features such as SiteInspector malware scanning, Comodo Secure DNS and improved social media functionality.
Is there a 64 bit version of Comodo IceDragon?
    Not currently. However, we hope to add one in the near future. The 32 bit application will still work perfectly on 64 bit operating systems.
What's the difference between Comodo IceDragon and Comodo Dragon
    Comodo Dragon is based on the Chromium engine used by Google Chrome. IceDragon is based on Firefox.
Which should I choose: Comodo Dragon or Comodo IceDragon?
    The choice is yours! Both versions of Dragon feature security and privacy improvements over the originals and both feature additional Comodo tools and services. Our goal is to offer a secure, feature-enhanced alternative to both Chromium and Firefox user-bases while retaining the benefits and user experience of the original browsers. If you prefer Firefox, try IceDragon. If Chrome is the browser for you, then why not give Dragon a whirl?
Why is a Browser that provides greater security and privacy necessary?
    Because malware plagues the Internet. In 2009 alone, more than 25 million new strains of malware were created, causing a 400% jump in compromised Web sites worldwide. Venturing onto the Web today (in an age in which one continually reveals social security, bank account and credit card numbers as well as a plethora of other sensitive data) can be like walking down a hallway with portraits on the walls. Portraits with eyes that watch everything you do and people hidden behind them ready to take advantage, based on what you let them see! Never have you needed to protect your privacy more on the Web!
Will Comodo IceDragon run on my computer?
    Comodo IceDragon will run on 32/64 bit Windows 7, Windows Vista and Windows XP.
Is Comodo IceDragon open source software?
    Yes. IceDragon is licensed under the the MPL (Mozilla Public License). IceDragon source code can be obtained from download.comodo.com/icedragon/icedragon.zip
Will trying Comodo IceDragon cost me anything?
    No. Comodo IceDragon is absolutely free. Much like many of the other innovative Internet solutions offered by Comodo

Support for Comodo IceDragon

User Guide
For help with CID, check out our online user guide.

Comodo Forums
Our community message board has a dedicated sub-forum for discussing Comodo IceDragon.
You'll benefit from the expert contributions of developers and fellow users alike and can find answers to any questions you may have.

Join free at forums.comodo.com
Email Support
If you are unable to find a solution in either the help guide or the forums, then please email support at dragonsupport@comodo.com

Please note that phone support is not available for our free products

wasalamualaikum wr wb


Arek NGAJUM IsoIso Ae [ The Fully Fuckin' Headache Lion ]

Monday, November 25, 2013

Slipstream Office 2010 setup with SP2


ASALAMUALAIKUM WR WB

Jumpa lagi dengan singo mumeth alias the fully fuckin' headache lion. Kali ini gak perlu banyak basa basi mari kita belajar membuat slipstream office 2010 dengan bantuan Command Prompt.
Dari sekian banyak guru ternyata guru saya Paul Thurrot dan HAL9000 adalah guru yang paling sederhana dan simple dalam memberi pelajaran mengenai CMD.exe pada saya. Dan terbukti dengan apa yang akan saya jelaskan berikut ini.
Sedang giat untuk belajar CMD lebih dalam agar bila nanti saya telah beralih ke Linux tidak terlalu terkejut dengan segala keruwetan syntax nya.
OK balik lagi ke office 2010.

Siapkan peralatan perang sebagai berikut:

1. CD/DVD instalasi office 2010.
2. Bila tidak punya CD/DVD silakan download file .exe instalasi office 2010 dari link dibawah
32bit


64bit


3. File office 2010 service pack 2 dapat di download gratis dari link dibawah


Langkah kerja:

1. Buat 2 buah folder baru di root C:\DVD dan C:\SP2
slipstreaming 1

2. Copy file X16-32250.exe dan officesp2010-kb2687455-fullfile-x86-en-us.exe ke drive root C:
slipstreaming 2

3. Klik Start > ketik CMD pada kolom Search > klik kanan cmd.exe pilih Run as administrator.
4. Setelah cmd terbuka buat perintah pertama sebagai berikut;
c:\x16-32250.exe<space>/extract:c:\dvd<enter>
slipstreaming 3

Note: <space> dan <enter> tidak perlu diketikan. tekan tombol space dan enter pada titik tersebut
        <space> and <enter> should not typed on cmd syntax, need only to hit the button on your keyboard
5. Lanjutkan dengan mengetikkan perintah berikut ini:
c:\officesp2010-kb2687455-fullfile-x86-en-us.exe<space>/extract:c:\sp2<enter>
slipstreaming 4
Lihat gambar dibawah untuk melanjutkan ekstrak file sp2
slipstreaming 5
slipstreaming 6

**see Note on point number 4
6. Setelah selesai proses nomor 5 ketik exit untuk keluar dari cmd.exe
slipstreaming 7

7. Buka C:\SP2 dan copy seluruh file yang ada didalamnya tanpa terkecuali kemudian paste-kan ke C:\DVD\Updates.
slipstreaming 8
slipstreaming 9

8. Tutup semua jendela yang masih terbuka termasuk ritsleting anda eee...maksudnya jendela yang masih terbuka.
Note: File X16-32250.exe dapat anda ekstak mengunakan 7-zip atau WinRar. Namun jangan anda lakukan karena anda tidak akan menemukan kehebatan hasil ekstrak seperti yang dilakukan oleh cmd.exe.
Mengapa: bila anda ekstrak dengan software ekstaktor maka anda perlu waktu tambahan untuk membuat beberapa folder dan memasukkan semua file hasil ekstrak kedalam folder-folder tersebut serta menyesuaikan nama folder dan file setup.
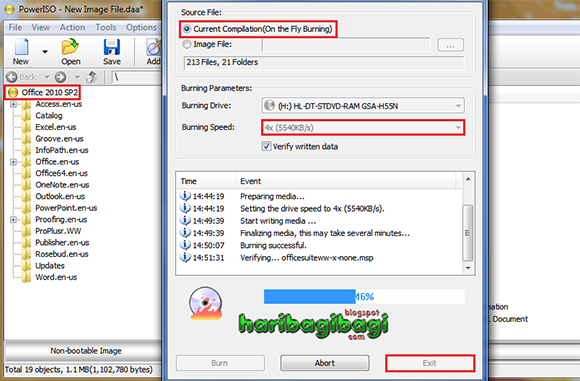
9. Berikutnya buka/jalankan PowerISO atau program Burning kesayangan anda yang sudah fasih anda gunakan. Kalau saya sangat suka dengan kesederhanaan dan kehebatan PowerISO.
Pada menu PowerISO klik Add > Add files and folders...
10. Browse folder C:\DVD anda dan blok semua file yang ada di dalamnya dengan cara klik file teratas kemudian tahan tombol Ctrl+Shift dan tekan tombol keyboard Panah turun, selanjutnya klik Add.

11. Rename icon DVD menjadi Office 2010 SP2 atau apasaja yang dapat memudahkan anda untuk mengingatnya.
12. Klik icon Burn pada menu PowerISO, tunggu proses Burning dan Verify selesai lalu Exit.
"Remember on PowerISO do not use Default Maximum speed on Burning, always change that to the lower one".
Burning 1

13. Test hasil kerja anda.
Burning 2
Burning 3

14. SELESAI, SEMOGA BERMANFAAT

TERIMA KASIH ATAS KUNJUNGAN TEMAN-TEMAN NEWBIE SAK DJAGAT

Thank you verymuch to Paul Thurrot and HAL9000
simple explanation with great goal  indeed


wasalamualaikum wr wb


Arek NGAJUM IsoIso Ae [ The Fully Fuckin' Headache Lion ]

Saturday, November 23, 2013

Booting ANDROID 4.3 x86 JB via USB Flash Drive

ASALAMUALAIKUM WR WB

Berani mencoba, berani gagal, pantang menyerah. Sebuah prinsip sederhana yg tertanam dalam pada lubuk hati seorang dungu bernama hari setyawan. Pada kesempatan ini saya akan meng-ilustrasikan cara membuat bootable USB flashdisk untuk instalasi ANDROID pada PC, Notebook, dan atau Netbook ala newbie blo'on hari setyawan. "Bagi yg merasa masih se-blo'on saya monggo kita belajar!!!".
Kebetulan pekerjaan servis hape lagi kosong dan sedang penuh pekerjaan servis komputer, maka tak salah untuk mencoba melakukan praktek walaupun sekedar mencoba OS ANDROID x86 yg sudah beredar. Dan kebetulan pula ada netbook pasien yang support untuk ANDROID x86 versi 4.3 JB. Kali ini kita akan mencoba ANDROID 4.3 x86.

Apasaja yg diperlukan adalah sebagai berikut:
--------------------------------------------------------------
1.  komputer yang support dg system ANDROID.[ lebih kepada hardwares ]
2.  file .iso ANDROID x86 versi 4.3 [JB]
3.  UNetbootin [media burning file .iso pada USB Flash Drive]
4.  flashdisk drive/sd card min 512mb
Android OS 1
Android OS 2


DOWNLOAD LINK
----------------------------
UNetbootin: 


ANDROID x86.iso: 


Support Model: Lihat disini

Memulai proses pembuatan bootable USB Flashdisk Drive
------------------------------------------------------------------------------
1. Pasang USB Flashdisk  ke pc, format melalui Computer Managements > disk Managements
2. Klik kanan UNetbootin pilih "run as..." atau dobel klik UNetbootin
Android OS 3


3. Pada tampilan menu UNetbootin klik "Diskimage" dan filenya adalah ISO, pada bagian Type pilih USB Drive, perhatikan Drive-nya apakah sudah sesuai dg drive anda pada pc. Kemudian klik Browse untuk memilih file .iso anda.
Android OS 4
Android OS 5


4. Klik OK untuk memulai proses extract dan copying file .iso ke dalam USB Flashdisk
Adroid OS 6


5. Tunggu beberapa saat sampai proses selesai.
6. Setelah selesai, apabila ingin langsung mencoba pada pc, klik "Reboot Now". Bila ingin dicoba di pc lain yang kompatibel silakan klik "Exit".
UnetBootin 1
Add caption


7. Pasang USB Flashdisk pada pc sasaran praktek. pada demo ini saya menggunakan pc/netbook pelanggan ber-merk ASUS dari tipe/model eee PC X101 dg processor intel Atom. Dan harddisk hybrid berkapasitas [cuman 8gb doang, " mending duitnya buat beli device ANDROID " hahahahaaa..]
8. Pada ASUS kacangan ini setelah anda tekan tombol power pc langsung tekan secara simultan tombol "Esc" jangan menekan tombol F2 pada keybord sampai keluar pilihan boot menu. Dan pilih USB Flashdisk sebagai boot pilihan lalu tekan Enter.
Boot Menu 1


9. Pada tampilan selanjutnya jangan memilih "instal". Pilih "Run Android x86 wthout installing" untuk mencicipi Android di pc [ lagian pc-nya punya orang bukan punya saya, hahahaaa..]
Boot Menu 2


10. Setelah selesai loading system Android silakan di OK dan nextnext saja agar segera muncul penampakan Android 4.3 JB di pc percobaan.
Android JellyBean 4.3-1

Android JellyBean 4.3-2

Android JellyBean 4.3-3


Selanjutnya masuk menu settings, gunakan tombol arrows untuk memilih About tablet. Dan periksa spesifikasi device anda yang menjalankan OS Android secara virtual tersebut.
Bila anda merasa puas dan ternyata spesifikasi hardware pada komputer sasaran anda sudah support OS Android [ termasuk sistem WiFi nya dapat bekerja ] untuk tahap selanjutnya adalah melakukan instalasi langsung ke harddisk komputer anda. Namun ini terserah anda, cukup dengan hanya mencobanya-pun sudah membuat saya cukup puas.
Bila ingin meng-instal ke komputer saya lebih menganjurkan anda gunakan Virtual Machine sehingga tidak merepotkan bila anda ingin mencopotnya dari komputer dual boot windows dan ANDROID [Linux based].

^|^SELAMAT MENCOBA^|^
                                                         

wasalamualaikum wr wb


Arek NGAJUM IsoIso Ae [ The Fully Fuckin' Headache Lion ]