Showing posts with label Internet. Show all posts

Wednesday, May 21, 2014

YAGI ANTENNA FOR 800Mhz 1XEVDO [ home made ]

ASALAMUALAIKUM WR WB

Few days ago i have posted how to gathering EVDO signal using a small simple quad antenna. Today i make the same topic about EVDO. Some experiments i have made with antenna, one has posted few days ago. Now i will give you other antenna prototype, this anternna is directional antenna. And the model very-very famous of all antenna models. This is a YAGI antenna.
What we need to build this kind of antenna ?
[ Sorry ] I always trying to experiment with low cost for everything i do, i prefer to recycle than buying new materials for experimental. But don't worry 'cause it's working. Here the materials need to build YAGI:
1. Aluminium pipe with 10 mm diameter to use as BOOM [ recycling an fm antenna ]
2. NYA cable with 1.5 mm diameter including it's shield
3. Screws and glue

First to build the antenna you can cut the cable with different length for directors and reflector. Do not remove cable shield because we will use some of them to be isolator for all directors and reflector to the boom pipe. So they wan't connected to each other.
Make point to drill on the boom with different gap wide, we will need 14 holes side by side on the boom. Then you might to drill 'em as same as the cable diameter we use. 
Here the measurements of all elements and gap for the directors and reflector :
I use only single reflector for my experimental YAGI antenna which is the longest element among all. You can make more for experiment by two or three stack reflector. This prototype actually having a driven to connect it to the antenna jack on the modem, but i don't want make more complicated. So i replace the driven using the modem placed to the boom directly. After all elements has made, now you can place them all to the boom. Look at this fig.
To place the modem onto the boom use the gap of director number 2 and 3. For best signal receive you can move it by slide to the front or back 'till gathering best signal receive. See the fig below.
NOTE : For save internet connection you can make setting on app by choosing Hybrid connection. So you won't lost connection when loose EVDO connection, 'cause it will automatically change to CDMA 1X connection. The establish connection will show on the modem app, or you can Open Network and Sharing Center on Windows to proof it.
To compare the different connection speed before end after using antenna, you can try to open a web page. See how long the page will show all. On the trial i open fuckbook page.
The download time is also different at all. Using IDM for downloading AVIRA free that 130 mb size from FileHippo i need two days to complete before using antenna. Exciting!!! with the antenna i need less 1 hour to complete the download. NICE RECYCLE TRICK
The most value is your own hands. Thousands will save for useless expensive brand new product that you can made by your own hands. THIS IS A HAND MADE YAGI ANTENNA
http://haribagibagi.blogspot.com/2014/05/yagi-antenna-for-800mhz-1xevdo-home-made.html


THANK YOU FOR READING

wasalamualaikum wr wb

Arek NGAJUM IsoIso Ae [ The Fully Fuckin' Headache Lion ]

Friday, May 16, 2014

Buat Sendiri Penguat Sinyal CDMA 1xEVDO 800Mhz

ASALAMUALAIKUM WR WB

Beranjak dari pengalaman berhenti berlangganan Telkom Speedy, yang kemudian beralih menggunakan paket Flexi Broadband ( dlm rangka menghemat pengeluaran..he..hee..hee..). Dengan semboyan memberi layanan hingga kecepatan 3,1Mbps akhirnya indera perasa tergiur juga. Namun betapa kecewanya setelah mencoba dan mengetahui kennyataan yang ada. Koneksi yang saya dapat ternyata tak seheboh semboyan nya. Perlu rekan-rekan ketahui bahwa domisili saya berjarak 35Km dari pusat kota Malang. Dan perlu anda ketahui juga bahwa sesungguhnya iklan menggiurkan dari 'semua' provider internet anda hanya berlaku untuk masyarakat yang hidup di tengah kota besar dan berjarak tidak lebih dari 5 km dari BTS mereka ( ayo jujur para provider, orang desa bukan orang goblok. Dan perlu kau ketahui orang-orang kota yang pandai, 80% mereka berasal dari desa. Yang notabene kalian anak tirikan dalam pelayanan. Dasar bangsaaat..).
Kita di akali, maka kita harus mengakali balik manusia-manusia bejat bermulut manis tersebut. Berfikir akan memperoleh Speed 3,1Mbps ( baca: hanya bisa diperoleh dengan jaringan EVDO ) ternyata hanya memperoleh Speed 152kbps dari jaringan CDMA 1X ( problem inilah yang membuat saya vakum posting untuk beberapa waktu, padahal banyak kasus menarik yang akan saya posting).
Beruntung saya pernah berkicimpung dalam dunia Pemancar FM, sehingga sedikit mengerti tentang antena. Dari rumus rancang bangun antena yang sederhana, dimana : Panjang gelombang = 300/Frekwensi. Rumus sederhana inilah yang digunakan para ahli antena yang sering membuat karya tulis di ARRL Antenna Handbook. Terbersit keinginan untuk memperooleh jangkauan sinyal EVDO dengan menggunakan antena.
Beberapa prototype telah saya buat dari yang sederhana dengan sistim 1/4 panjang gelombang Dipole hingga menggunakan directional Yagi telah saya coba. Namun akhirnya pilihan jatuh pada pilihan yang akan saya jelaskan untuk rekan-rekan. Mengapa saya lebih memilih model ini, karena bentukknya yang mungil, tidak perlu biaya ekstra ( mahal ) namun mampu menhadirkan 4bar sinyal EVDO yang stabil ke dalam kamar tidur saya ( bahkan saat diluar peak mampu mencapai full 5bar konsisten ). Kecil tapi hebat, saya menyebutnya antena SEMUT API. Kecil tapi bila menyengat maka tubuh terasa panas.

Baik tidak usah panjang lebar, langsung siapkan bahan dan peralatan berikut ini:
1. 1 lembar kertas HVS baru atau bekas tidak ada masalah yang pensing salah satu bagiannya masih kosong/polos.
2. Potlot
3. Penggaris besi siku, bila tidak punya pinjam tetangga yang berprofesi sebagai tukang kayu.
4. Beberapa biji paku triplek dan Papan kayu atau Triplek tebal (1cm ketebalan)
5. Kabel jaringan listrik PLN untuk rumah tangga ( 1 meter, sisanya untuk membuat gelang he..hee..heee..)
6. Solder dan Timah
7. Tang potong dan pisau Cutter.
8. PIG TAIL ( kabel dengan port USB dikedua ujungnya ) jika diperlukan.

Berikut cara mengolah bahan-bahan tersebut menjadi adonan siap pakai:
1. Bagi ukuran kertas HVS menjadi 2 ukuran yang sama panjang dan lebarnya. Buatlah gambar seperti gambar berikut ini. Setelah jadi, letakkan gambar tesebut di atas sebilah papan atau triplek.
http://haribagibagi.blogspot.com/2014/05/buat-sendiri-penguat-sinyal-cdma-1xevdo.html
2. Ukuran garis-garis pada gambar adalah sebagai berikut:
   -Untuk garis pada kotak persegi panjang disebelah kanan dari gambar:
   *Panjang = 79 mm
   *Lebar    = 158 mm
   -Untuk garis yang berbentuk 2 kubus miring di sebelah kiri gambar:
   *Tiap-tiap garis yang saling terhubung dan membentuk dua kubus tersebut memiliki panjang = 38,5 mm
3. Setelah gambar selesai dan telah anda letakkan pada sebilah papan/triplek maka, tancapkanlah sebiji paku pada tiap-tiap titik pertemuan garis-garis tesebut (sudut). Paku hanya perlu ditancapkan 1/3 bagian saja. Cara ini saya adopsi dari cara tukang bangunan dalam mempersiapkan besi calon rangka tiang cor.
http://haribagibagi.blogspot.com/2014/05/buat-sendiri-penguat-sinyal-cdma-1xevdo.html
4. Kupas kulit kabel tembaga NYA dengan diameter 1,5mm ( akan lebih baik bila anda dapat menemukan kawat berlapis email ). Letakkan kawat pada sisi dalam paku yang menancap, kemudian pada bagian dalam kawat tancapkan lagi paku. Lakukan hal yang sama pada setiap sudut. Gunanya adalah ketika anda menekuk kawat maka akan tercipta sebuah sudut yang presisi 90 derajat ( mudahkan kan triknya he..hee..hee...). Ini namanya rumus Mata Memandang Otak Berfikir.
http://haribagibagi.blogspot.com/2014/05/buat-sendiri-penguat-sinyal-cdma-1xevdo.html
5. Setelah kedua bentuk kawat antena ini terbentuk, kemudian masih menggunakan bantuan kertas dan gambarnya yang ada, lepaskan kawat yang telah membentuk persegi panjang dan satukan dengan yang berbentuk 2 buah kubus miring. Setelah posisi keduanya presisi, beri penyangga pada beberapa sudut kawat yang berbentuk kubus ke kawat yang berbentuk persegi panjang kemudian disolder menggunakan solder filamen berkekuatan 40 watt agar cepat dan kuat menempel satu sama lain. 
Pada ujung kawat yang dibentuk menjadi 2 kubus kembar, sisakam 10 cm yang akan kita gunakan sebagai pembangkit induktansi sinyal ke MODEM USB anda. Kira-kira diperlukan 1,5 sampai 2 lilit. Sebelum dililitkan pada bodi USB MODEM, sisakan 2 cm dari pangkal sambungan akhir kawat berbentuk kubus kembar.
http://haribagibagi.blogspot.com/2014/05/buat-sendiri-penguat-sinyal-cdma-1xevdo.html

 Bagi anda yang biasa berkecimpung di dunia Citizen Band 2 meter, tentu bentuk antena seperti ini sudah bukan barang yang asing. Namun karena frekwensi jauh lebih tinggi maka memungkinkan bentuknya jadi amat sangat lebih minimalis.

Kini antena telah selesai di rakit dan siap di uji coba. Namun perhatikan gambar-gambar berikut ini sebagai pembanding kekuatan sinyal yang diperoleh sebelum dan sesudah menggunakan antena.
Modem yang saya gunakan ber-merk FlashOne bundling Flexi yang telah saya Unlock sehingga dapat digunakan untuk operator CDMA lainnya. Sebagai catatan di negeri kita INDONESIA jaringan CDMA berjalan pada frekwensi 800Mhz baik itu CDMA 1X maupun EVDO Rev A. Sedangkan EVDO Rev B berjalan di frekwensi 1900 Mhz. Di INDONESIA hanya SmartFren yang memakai karena diakui Qualcomm produk EVDO Rev B tidak dilanjutkan akibat kegagalannya di jaringan tersebut.
Berikut ini adalah gambar yang menunjukkan sebelum saya menambahkan antena pada modem. Dimana hanya mampu menangkap sinyal CDMA 1X:
http://haribagibagi.blogspot.com/2014/05/buat-sendiri-penguat-sinyal-cdma-1xevdo.html
Gambar menyampaikan pesan bahwa sinyal 1XEVDO hanya bualan iklan BULLSHIT. Dan ketika dipaksa pada jaringan CDMA 1X lihat kecepatan yang saya dapat pada gambar berikut:
http://haribagibagi.blogspot.com/2014/05/buat-sendiri-penguat-sinyal-cdma-1xevdo.html
Bahkan ketika mencoba uji kecepatan koneksi di OOKLA tak sekalipun memperoleh hasil.
Berikut ini hasil uji koneksi setelah menggunakan bantuan antena sebagai penguat sinyal tambahan.
http://haribagibagi.blogspot.com/2014/05/buat-sendiri-penguat-sinyal-cdma-1xevdo.html
Perhatikan dengan cermat indikator bar EVDO sambil memutar arah antena menghadap dan amati perubahan naik atau turunnya bar sinyal. Jika ditemukan arah yang menghasilkan bar yang cukup kuat maka hentikan memutar arah antena dan biarkan selama 3 sampai 5 menit. Sambil perhatikan perubahan pada indikator bar sinyal, adakalanya akan naik atau turun. jika penurunan masih dalam kondisi normal yakni tidak sampai menyebabkan indikator bar sinyal EVDO hilang sama sekali. Hal tersebut menunjukan seberapa kuat sinyal EVDO yang anda peroleh sesungguhnya. Jika tidak terjadi drop sinyal sampai 0 (nol) maka anda sudah dapat klik tombol Connect pada pilihan EVDO. Pada kasus saya sinyal stabil di 4 bar dan kadang naik jadi full 5 bar. Sejak saat itulah saya mulai dapat membuat posting dan upload gambar di blogger. ALHAMDULILLAH....ternyata tak semudah yang dibayangkan orang pandai dalam rangka ngakali atau mempecundangi orang desa. Bahkan berbalik jadi bumerang bagi mereka sendiri. Dengan 17.000 perak per minggu bisa memperoleh Speed 3,1 Mbps, lihat buktinya:
http://haribagibagi.blogspot.com/2014/05/buat-sendiri-penguat-sinyal-cdma-1xevdo.html
Dengan sedikit bantuan PIG TAIL sepanjang 1 meter saya letakkan USB MODEM + ANTENA di sebelah jendela kamar dan saya hadapkan menuju titik 0 derajat UTARA dengan ditopang pipa aluminium bekas antena VHF pesawat televisi. Kini bikin postingan pakai koneksi murahan sudah bukan masalah buat wong ndeso.
http://haribagibagi.blogspot.com/2014/05/buat-sendiri-penguat-sinyal-cdma-1xevdo.html
Hasil tes dengan mesin OOKLA:
http://haribagibagi.blogspot.com/2014/05/buat-sendiri-penguat-sinyal-cdma-1xevdo.html

SELAMAT MENCOBA DAN BEREKSPERIMEN
Jangan takut kerugian dari pengeluaran biaya, tanpa kerugian anda tak akan pernah memperoleh keuntungan.
TERIMA KASIH

wasalamualaikum wr wb
Arek NGAJUM IsoIso Ae [ The Fully Fuckin' Headache Lion ]

Saturday, November 16, 2013

Opera Browser for Windows and Linux

ASALAMUALAIKUM WR WB

Opera Browser

Find something unexpected

The Discover feature gives you top-quality news and entertainment from around the globe. Enjoy new content from a variety of categories and read articles from your region, in your language.

Browse with style
Opera's interface combines precision and quality. Integrating modern style with powerful features, Opera gives you the freedom to truly open the web and explore.

Search and navigate easily
Opera has one intuitive, powerful location for searching and navigating the web. Search using multiple providers and view site suggestions as you type.

Speed up on slow networks
Off-Road mode compresses pages for faster, all-conditions browsing. It helps you stay online when your connection slows down.

Organize your favorites
An enhanced Speed Dial groups your top-visited sites directly on a custom start page. Quickly search and access your favorite content with refined searching and grouping options.
Linux[es] Editon
Windows Editon
Keep what you find
Found something you'll want to come back to? The Stash feature captures a page with one easy click and organizes your pages into a simple, sophisticated list. Scan your Stash in a resizable page preview or search what you've saved, by keywords.

Get a better mail experience
Opera Mail is a lightweight, customizable mail client that refines your email experience. Powerful and intuitive, Opera Mail makes composing and sorting mail simple.

wasalamualaikum wr wb


Arek NGAJUM IsoIso Ae [ The Fully Fuckin' Headache Lion ]

Thursday, November 14, 2013

Configuring DNS Jumper into your PC Settings

ASALAMUALAIKUM WR WB


Okay guys, now i will show you how to change your internet setting on Windows PC by the help of work of DNS Jumper Tool [ its completely free ]. I am a stupid and lazy PC user at all. So by this little tool now everything i want is easy to do. 
As you know [ better than me ] DNS Jumper is a portable tool. You don't need to install this tool at first. Just extract what have you downloaded. If don't have download DNS Jumper already, below i give you the trusted link to have it.

For more convenient extract it to your desktop may the best think.
Open the folder
Double click the only icon stay there or Run as admin to running this simpliest quick tool
DNS Jumper 1
Open Device Manager if you do not know your pc adapter for internet connection, whatever that [ include wireless adapter will show there ] make it the same name with the adapter name on DNS Jumper field before you running the tool.
DNS Jumper 2
For the beginner [ as same as me ] its be better if you choose MANUAL on Choose a DNS Server Field, but you can choose what way you want click it fields. 'Cause i'm a lazy i use manual way. Now click Fastest DNS. There will show a new window, don't forget to click MIXED 'till it checked.
Next click Find Fastest DNS, then you will see a new as show below.
DNS Jumper 3
Remember, if you have marked MIXED now you'll got both first and the second DNS servers to applying for your PC internet settings automatically by click Apply Fastest DNS.
After you have applied the servers at all, now you can trust this tool by checking the affect to your adapter settings.
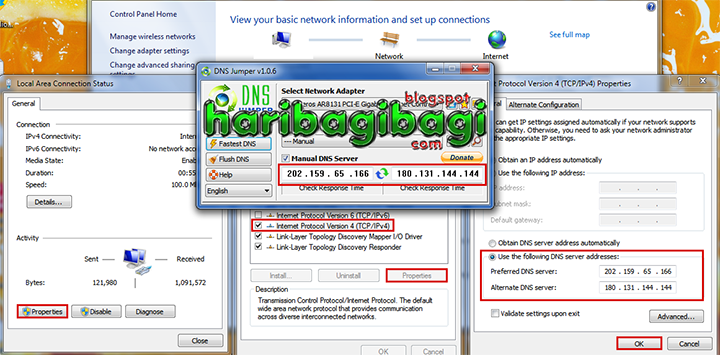
Proof it by simply right click internet connection icon on the right bottom of you PC taskbar. Then click the radio link Open Network  and Sharing Center. There you need to click Local Area Connection or whatever on the internet connection established.
dns jumper 4

On next window click Properties > Internet Protocol Version 4 [ TCP/IPv4 ] > Properties
Look at the bottom of GENERAL tab, are they same as DNS Jumper. If its YES click OK and close all open window.
RESTART YOUR PC TO TAKE EFFECT !!!!

Now the time for every of you who was BORN, Life and will Buried in the land Of Lovely REKIPLIK OF ENDONESA. Please COPY all the DNS Servers below into your DNS Jumper config.ini file so you will getting the right fastest DNS Servers to the Region of The REKIPLIK OF ENDONESA.
HERE THE LISTs :

ID - Speedy.telkom.net.id=110.137.128.44, True
ID - ns1.digi.net.id=122.200.48.14, True
ID - ns2.dtp.net.id=202.43.160.51, True
ID - 9.6.-ESV-R3=202.43.178.244, True
ID - ns2.cepat.net.id=202.43.178.245, True
ID - dua.iptek.net.id=202.46.1.2, True
ID - ns2.orbicom.net.id=202.75.17.2, True
ID - fep712jubilee.com=202.137.16.212, True
ID - [secured]=202.152.162.66, True
ID - socrates.xl.net.id=202.152.254.245, True
ID - hertz.xl.net.id=202.152.254.246, True
ID - ns2.indosat.net.id=202.155.0.15, True
ID - mailgate.wasantara.net.id=202.159.65.166, True 
ID - CacheDNS-BTM.telkom.net.id=203.130.193.74, True
ID - ns1.hanastar.net.id=203.160.56.18, True
ID - hanastar.net.id=203.160.57.11, True
ID - ns2.power.net.id=203.190.48.210, True
ID - ns2.telkomflexi.com=222.124.249.115, True
ID - ns1.nawala.org=180.131.144.144, False
ID - ns2.nawala.org=180.131.145.145, False

copy them into your Notepad first. Then EDIT DNS Jumper config.ini by right click it and Edit. Paste 'em all right above the letters [ Ipv4_Security ] and at the below the name of CHINA DNS Server at the last. And SAVE it.
See below 
dns jumper 5
Q: Why should i do that?
A: It should do because all the DNS Servers list at the DNS Jumper config will give me very very very very weak internet connection event it will more weakest than an HIV critical patient [ sorry ].

Doesn't it more convenient for the most stupid and lazy man like hari setyawan

ENJOY !!!

wasalamualaikum wr wb


Arek NGAJUM IsoIso Ae [ The Fully Fuckin' Headache Lion ]

DNS JUMPER v1.0.6 [ Support Windows 8 ]

ASALAMUALAIKUM WR WB


by velociraptor
DNS Jumper W 8-1
DNS – or domain name system – is the protocol on the internet that turns human-comprehensible website names such as sordum.org into addresses understandable by machines.(machine-readable “IP addresses”) , In some cases, you can increase the browsing speed or improve your security by replacing the DNS provided by your provider , DNS Jumper is a tool which makes it easy for you

Why should you use DnsJumper:
1. It could help you reach websites where access has been blocked.
2. It might improve your security by using secure DNS servers.
3. It can protect your children from inappropriate websites and can Block Porn Sites. (Just use one of the Family safe DNS)
4. It can speed your browsing (move to a faster Domain Name Service)
5. Changing your settings manually can take a little work , But with DNS Jumper it’s relatively easy (one click)
Dns jumper v1.0.6 has now Ipv6 support and dozen innovation ,such as you can easily create your own Dns groups , you can see your current dns easily… usw. Dns jumper is Portable and Freeware
DNS Jumper W8-2

What is new:
1. [ Fixed ] – Dns Jumper enables CheckBalloonTips registry enrty Automatically (REG_DWORD=1) (If you want to disable it , Just edit DsnJumper.ini and change CheckBalloonTips=True to False)
2. [ Fixed ] – Updates messages are only in English language
3. [ Fixed ] – Languages doesn’t sorted in alphabetical order
4. [ Fixed ] – Minor corrections of codes

How to Change Your DNS Settings
DNS Jumper W 8-3

1. Select one of them (Under Choose a DNS Server combo)
2. Click “Apply DNS” button
Note: For IPv6 just tick the IPv6 checkbox

How to Restore your DNS settings or Use your ISP’s Default DNS again
There are two ways to do that:
1. Click “Quick configuration” button (has Star icon) and Pick Your Choice or
2. Under the Choose a DNS Server combo select “Restore” or “Default” and then click “Apply DNS button”
Note: For IPv6 just tick the IPv6 checkbox
DNS Jumper W 8-4

Our DNS list is just a samle , Please don’t use unsecure DNS servers , we are not responsible for any illegality or damage. Until now  DNS jumper has been downloaded more than 1.800.000 times (our server + Other web resources) THANKS FOR YOUR TRUST

Supported operating systems: Windows Xp , Windows Vista , Windows 7 , Windows 8 , Windows 8.1 – (x86 & x64)


Supported languages: English , Turkish , German , Swedish , Italian , Spanish , Portuguese-Brazil , Korean , Romanian , Chinese (Simplified) , Chinese (Traditional) , Arabic , Czech , Japanese , Finnish , Vietnamese , Dutch , French , Russian , Malay-Malaysia , Slovenian , Indonesian , Hungarian

A special thanks to translators:
Swedish : Åke Engelbrektson
Italian : Eligio Greco
Spanish : Óscar Cuesta
Portuguese-Brazil : Pedro Gabriel Schneider
korean : 4Li
Romanian : Florin David
Chinese (Simplified): Chonghua
Chinese (Traditional): Danfong Hsieh
Arabic : ismail ar
Czech : Mikrom
Japanese : yamada
Finnish : Petri Lietjärvi
Vietnamese : Vanxuanemp
Dutch : Ard Sur , Geert Delmeiren
French : Tophechris
German : Velociraptor – Corrected by Mikka
Russian : Andrey Zaikin
Malay-Malaysia : Suhaimi Shaarani
Slovenian : Sloprlek
Indonesian : (Arif Wicaksono)
Hungarian : Bluestar


wasalamualaikum wr wb


Arek NGAJUM IsoIso Ae [ The Fully Fuckin' Headache Lion ]

Sunday, November 3, 2013

Free & Public DNS Servers (Updated October 2013)

ASALAMUALAIKUM WR WB
blog logo
Free & Public DNS Servers (Updated October 2013)


For Indonesia:
--------------------------------------
--------------------------------------
122.200.48.14   =>  34 mili detik
122.200.48.15   =>  34 mili detik
125.160.2.34   =>  31 mili detik  [ 3-11-2013 ]
202.43.178.244 =>  34 mili detik
202.43.178.245 =>  35 mili detik
202.46.1.2             =>  35 mili detik
202.95.128.60   =>  35 mili detik
202.134.0.61   =>  34 mili detik
202.134.0.155   =>  32 mili detik
202.134.1.10   =>  21 mili detik  [ 3-11-2013 ]
202.150.64.21   =>  39 mili detik
202.159.65.166 =>  31 mili detik  [ 3-11-2013 ]
202.182.182.182 =>  33 mili detik
203.130.196.5   =>  31 mili detik  [ 3-11-2013 ]
203.190.55.210 =>  32 mili detik
---------------------------------------
---------------------------------------

Above listed some DNS Servers allowed to the region of Indonesia. How to apply them to your internet settings for the best internet connection. I've listed the connection has bellow 50 milliseconds only.
Click Start button on the left bottom corner ef the desktop > Control Panel > Network And Internet > Network and Sharing Center 
On the left panel will be exist some Radio links, click Change adapter settings.
If you use a cable connection double click Local area connection.
On the next window hit Properties.
On the new window double click Internet Protocol Version 4 ( TCP/IP4).
Then on the next window please tab General
Click Obtain an IP address automatically and click Use the following DNS server addresses
Use have more little time as the Preffered DNS server
and less slowly as the Alternate DNS server and hit OK. Close all opened windows and restart your PC for the best result. See following picture below
DNS Settings


Provider                 Primary DNS Server  Secondary DNS Server
------------------------------------------------------------------------
Level31                         209.244.0.3         209.244.0.4
Google2                         8.8.8.8                 8.8.4.4
Securly3                         184.169.143.224 184.169.161.155
Comodo Secure DNS 8.26.56.26         8.20.247.20
OpenDNS Home4         208.67.222.222 208.67.220.220
DNS Advantage         156.154.70.1         156.154.71.1
Norton ConnectSafe5 198.153.192.40 198.153.194.40
GreenTeamDNS6         81.218.119.11 209.88.198.133
SafeDNS7                 195.46.39.39         195.46.39.40
OpenNIC8                 74.207.247.4         64.0.55.201
Public-Root9                 199.5.157.131 208.71.35.137
SmartViper                 208.76.50.50         208.76.51.51
Dyn                         216.146.35.35 216.146.36.36
censurfridns.dk10         89.233.43.71         89.104.194.142
Hurricane Electric11 74.82.42.42
puntCAT12                 109.69.8.51
-------------------------------------------------------------------------

[1] The DNS servers listed above as Level3 will automatically route to the nearest DNS server operated by Level3 Communications, the company that provides most of the ISPs in the US their access to the Internet backbone.

[2] Google also offers IPv6 public DNS servers: 2001:4860:4860::8888 and 2001:4860:4860::8844.

[3] Securly's DNS servers block adult content by default, including of course X-rated content but also adult oriented pages on websites like Wikipedia, adult themed searches on Google, and more. The grown-ups in the house can sign up here to bypass all restrictions.

[4] OpenDNS also offers DNS servers that block adult content, called OpenDNS FamilyShield. It's also free but you do have to sign up here. A premium DNS offering is also available, called OpenDNS Home VIP.

[5] The Norton ConnectSafe DNS servers listed above block sites hosting malware, phishing schemes, and scams. Use 198.153.192.50 and 198.153.194.50 to block those sites plus those with pornographic content. Use 198.153.192.60 and 198.153.194.60 to block all previously mentioned site categories plus those Norton deems "non-family friendly."

[6] GreenTeamDNS "blocks 18 categories which include malware, botnets, dangerous websites, adult related content, aggressive/violent sites as well as advertisements and drug-related websites" according to their FAQ page. Premium accounts have more control.

[7] Register here with SafeDNS for content filtering options in several areas.

[8] The DNS servers listed here for OpenNIC are just two of many in the US and across the globe. Instead of using the OpenNIC DNS servers listed above, see their complete list of public DNS servers here and use two that are close to you or let them tell you that automatically here. OpenNIC also offers some IPv6 public DNS servers.

[9] These Public-Root DNS servers are the only two currently operating in the United States but if you're located ouside the US, see their complete list here and choose the best servers based on your location.

[10] The censurfridns.dk DNS servers are uncensored, operated by a privately funded individual, and are physically located in Denmark. You can read more about them here. IPv6 DNS servers are also available at 2002:d596:2a92:1:71:53:: and 2002:5968:c28e::53

[11] Hurricane Electric also has an IPv6 public DNS server available: 2001:470:20::2.

[12] puntCAT is physically located near Barcelona, Spain. The IPv6 version of their DNS server is 2a00:1508:0:4::9.

Note: Primary DNS servers are sometimes called preferred DNS servers and secondary DNS servers are sometimes called alternate DNS servers. Primary and secondary DNS servers can be "mixed and matched" to provide another layer of redundancy.

Top Free Internet DNS Servers

Google Public DNS
Google operates the world's largest public DNS service. Launched in December 2009, it supports many billions of DNS queries per day, much of the volume generated from clients outside the U.S. Google Public DNS utilizes servers at IP addresses 8.8.8.8 and 8.8.4.4. The company developed this service as one of its corporate initiatives to make the Internet more accessible and easier for everyone to use, making it a logical choice for users worldwide.
Vendor's Site
OpenDNS
The oldest of all services on this list, OpenDNS also supports billions of DNS queries per day via its servers operating on 208.67.222.222 and 208.67.220.220. In addition to its basic name resolution service, OpenDNS Home Solutions provides free Web site filtering of adult content (called FamilyShield) and URL spell correction with accompanying installed software. The company also sells various security products to businesses. Those looking for an alternative to Google products and a service that works well outside the U.S. also tend to like OpenDNS.
Vendor's Site
Norton DNS for Home
Security software company Symantec began offering its free Norton DNS in 2010. The package works similarly to OpenDNS FamilyShield. Utility programs that automatically configure the DNS server addresses 198.153.192.50 and 198.153.194.50 and set up basic content filtering exist for Windows, Mac OS X and Android. Those already using OpenDNS or Google Public DNS but dissatisfied with those service can try Norton DNS to see how it compares.
Vendor's Site
Comodo Secure DNS
In addition to its free DNS service, Comodo is known for the Antivirus package it sells along with other software products. Access the Comodo DNS servers at 8.26.56.26 and 8.20.247.20.
Vendor's Site
DNS Advantage
A company called Neustar manages both the free DNS Advantage service as well as the commercial (not free) UltraDNS system. Enter the DNS server addresses 156.154.70.1 and 156.154.71.1 to use DNS Advantage.
Good Luck and Have a good day with fast internet connection

wasalamualaikum wr wb

Arek NGAJUM IsoIso Ae [ The Fully Fuckin' Headache Lion ]

Tuesday, July 10, 2012

DNS Checker [ How save your DNS ]

Asalamualaikum WR WB


Check your DNS if it save or not. Prevent your computer to infected DNS.
GREEN mean your DNS is save.
RED mean you're using infected DNS changer.
DNS Changer Check-Up

DNS Resolution = GREEN

Your computer appears to be looking up IP addresses correctly!

Had your computer been infected with DNS changer malware you would have seen a red background.  Please note, however, that if your ISP is redirecting DNS traffic for its customers you would have reached this site even though you are infected. For additional information regarding the DNS changer malware, please visit the FBI's website at:
http://www.fbi.gov/news/stories/2011/november/malware_110911

You can also test to see if you are affected by visiting the following DNSChanger Check-Up sites below. If this Check-Up site indicates that you are affected by DNSChanger, then visit http://www.dcwg.org/cleanup.html for information on how to address this problem.


URL
Language
Maintainer
English
DNS Changer Working Group (DCWG)
German
Bundeskriminalamt (BKA)
Bundesamt für Sicherheit in der Informationstechnik (BSI)
Finish
CERT-Fi
Swedish
CERT-Fi
Dutch/French
CERT.be
French
CERT-LEXSI
English/French
CIRA and CCIRC
English
CIRCL
Dutch/English
SIDN


wasalamualaikum wr wb

Arek NGAJUM IsoIso Ae [The Fully Fuckin' Headache Lion]